Introduction to Peanut Butter Cheesecake
Imagine cutting into a velvety smooth cheesecake and discovering the rich, nutty flavor of peanut butter perfectly balanced with tangy cream cheese. Peanut Butter Cheesecake is more than just a dessert – it’s a celebration of one of America’s most beloved flavor combinations that transforms the classic New York-style cheesecake into something extraordinary.
The history of cheesecake dates back thousands of years, with ancient Greeks serving it to athletes during the first Olympic games for energy. However, the American-style cheesecake we know and love today emerged in the early 1900s, perfected in New York delis and restaurants. The addition of peanut butter to cheesecake is a relatively modern innovation that speaks to America’s love affair with this versatile legume spread, which became a household staple in the early 20th century.
What makes this particular Peanut Butter Cheesecake recipe exceptional is its perfect balance of flavors and textures. The natural saltiness and nuttiness of peanut butter complement the tangy richness of cream cheese beautifully, while the graham cracker crust provides a delightful textural contrast. This isn’t just another cheesecake variation – it’s a harmonious fusion that elevates both ingredients to create something truly special.
This recipe has gained tremendous popularity among dessert enthusiasts because it combines the sophisticated appeal of cheesecake with the comfort food familiarity of peanut butter. It’s a dessert that appeals to both children and adults, making it perfect for family gatherings, special occasions, or whenever you want to create something memorable that will have everyone asking for the recipe.
Why You’ll Love This Peanut Butter Cheesecake
This Peanut Butter Cheesecake will quickly become your go-to dessert for several compelling reasons. The taste is truly exceptional above all else. The creamy, nutty richness of peanut butter melds seamlessly with the tangy cream cheese, creating a sophisticated yet comforting taste that’s neither too sweet nor too heavy. Each bite delivers a perfect balance that satisfies your dessert cravings without overwhelming your palate.
The texture is what dreams are made of – silky smooth and incredibly creamy with just the right amount of density. Unlike some cheesecakes that can feel heavy or overly rich, this peanut butter version has a lighter quality thanks to the natural oils in peanut butter that create an almost mousse-like consistency. The contrast between the smooth filling and the slightly crunchy graham cracker crust adds another layer of textural interest that keeps every bite engaging.
From a practical standpoint, this recipe is surprisingly approachable for home bakers. While cheesecake has a reputation for being finicky, this version is quite forgiving. The peanut butter actually helps stabilize the filling, making it less prone to cracking and easier to achieve that perfect smooth top. The ingredient list is straightforward with pantry staples, and the technique, while requiring some patience, doesn’t demand advanced baking skills.
This cheesecake is incredibly versatile for different occasions. It’s elegant enough for dinner parties and holiday celebrations, yet familiar enough for casual family gatherings. It travels well when properly chilled, making it an excellent choice for potluck dinners or office celebrations. The make-ahead nature of cheesecake is another huge advantage – it actually improves after a day in the refrigerator as the flavors meld and develop.
The customization possibilities are endless. You can experiment with different types of peanut butter (crunchy for texture, natural for deeper flavor), various crust options (chocolate cookie, vanilla wafer, or even pretzel), and countless topping combinations. This basic recipe serves as a foundation for creativity, allowing you to adapt it to personal preferences or seasonal themes.
Ingredients for Peanut Butter Cheesecake
For the Cheesecake Filling:
- 2 (8 oz) packages cream cheese, softened (16 oz total/454g) – Must be at room temperature for smooth mixing
- 1 cup creamy peanut butter (240g) – Use high-quality peanut butter for best flavor
- ¾ cup granulated sugar (150g) – Adds sweetness and helps build structure.
- 3 large eggs, room temperature – Essential for binding and creating smooth texture
- 1 teaspoon vanilla extract – Boosts and balances the overall flavor.
For the Crust and Toppings:
- 1 prepared graham cracker crust (9-inch) – Or make your own with 1½ cups graham cracker crumbs, ⅓ cup melted butter, and ¼ cup sugar
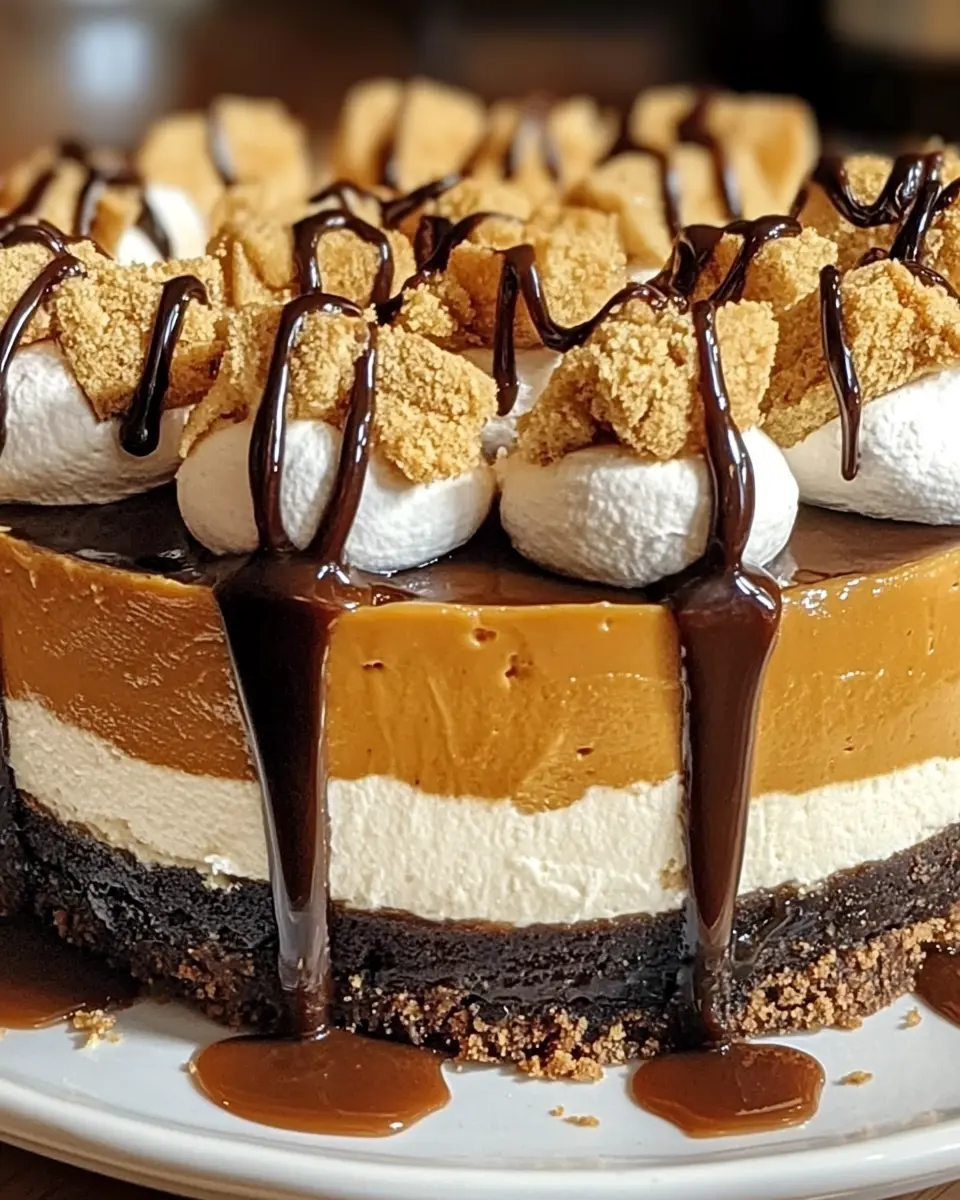
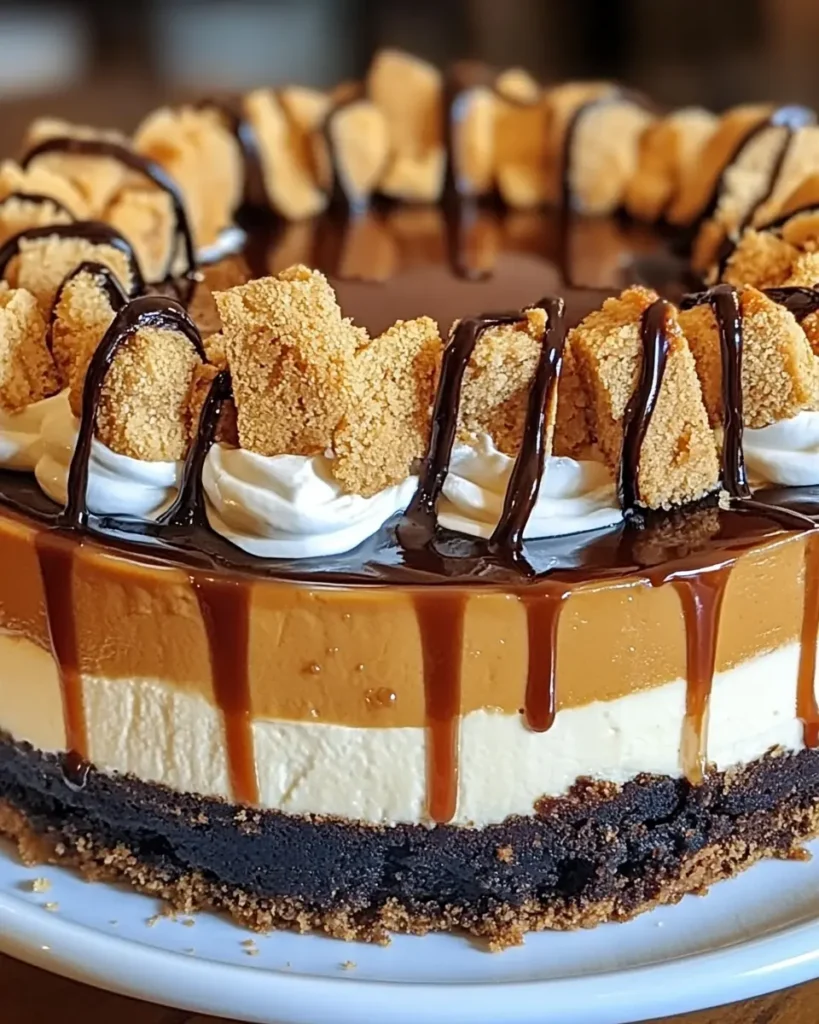
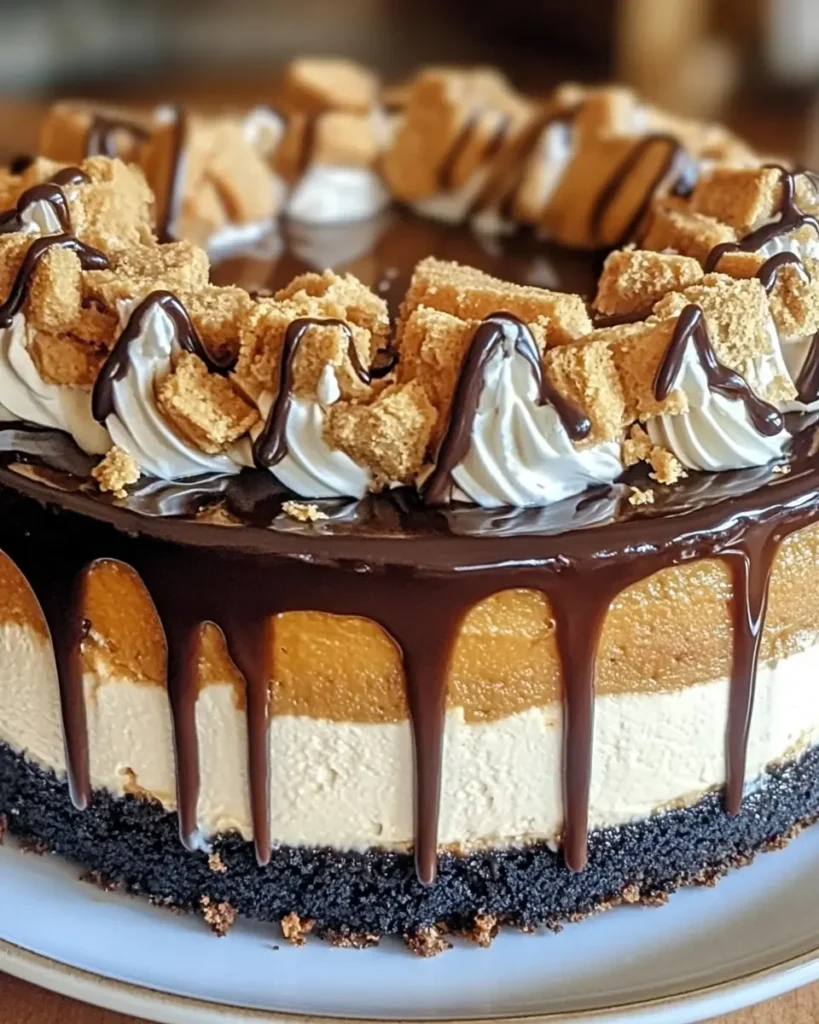
- 1 cup whipped cream – Used for garnish and added presentation.
- Chocolate drizzle – Melted chocolate or high-quality chocolate syrup
Optional Substitutions and Ingredient Notes:
- Cream Cheese: Only use full-fat cream cheese; low-fat versions will affect texture and may cause cracking
- Peanut Butter: Natural peanut butter works well but may require extra mixing; avoid reduced-fat versions
- Sugar: You can substitute up to ¼ cup with brown sugar for deeper flavor
- Eggs: Must be at room temperature; cold eggs can cause the mixture to curdle
- Crust Alternatives: Try chocolate cookie crust, vanilla wafer crust, or even a pretzel crust for variety
- Dietary Modifications: For gluten-free, use gluten-free graham crackers for the crust; for lower sugar, reduce to ½ cup sugar (texture may be slightly affected)
How to Make Peanut Butter Cheesecake – Step by Step
Step 1: Preparation and Oven Setup (15 minutes)
Begin by preheating your oven to 325°F (160°C). This lower temperature is crucial for preventing cracks and ensuring even cooking throughout the cheesecake. Position your oven rack in the center position for optimal heat distribution.
Make sure all ingredients, especially the cream cheese and eggs, are at room temperature before starting. This is perhaps the most critical step for success – cold ingredients will create a lumpy batter that’s difficult to smooth out. If you’ve forgotten to take them out ahead of time, you can quickly soften cream cheese by cutting it into small cubes and letting it sit for 15-20 minutes, or by using brief 10-second intervals in the microwave.
Step 2: Create the Perfect Cheesecake Batter (10-15 minutes)
In a large mixing bowl, combine the softened cream cheese and peanut butter. Using an electric mixer on medium speed, beat these together for 2-3 minutes until the mixture is completely smooth and no lumps remain. This step is essential any lumps at this stage will carry through to the final cheesecake.
Frequently scrape the sides of the bowl while mixing to ensure all ingredients blend uniformly. The mixture should be light in color and fluffy in texture when properly combined.
Add the granulated sugar and continue beating for another 2-3 minutes until the mixture is creamy, smooth, and well combined. The sugar should be completely dissolved, and the mixture should have a slight sheen.
Now comes the critical egg addition phase. Add the eggs one at a time, beating on low speed and mixing just until each egg is incorporated before adding the next. Mixing too much at this point can introduce excess air, which may cause the cheesecake to crack as it bakes. After each egg addition, scrape down the bowl sides to ensure even mixing.
Finally, stir in the vanilla extract with just a few gentle folds or brief mixing on low speed.
Step 3: Assembly and Baking (35-40 minutes)
Pour the peanut butter cheesecake mixture into your prepared graham cracker crust, taking care not to splash or create air bubbles. Use a large spoon or spatula to guide the mixture evenly into the crust.
After filling the pan, lightly tap it on the counter several times to remove any trapped air bubbles. Then, use a spatula to smooth out the top for an even, level surface.
Put the cheesecake into the oven preheated to the correct temperature and bake it for 35 to 40 minutes.
The cheesecake is done when the center is just set but still has a slight jiggle when you gently shake the pan. The edges should be set and slightly puffed, while the center should appear just barely firm. Remember, the cheesecake will continue cooking from residual heat even after removal from the oven.
Avoid opening the oven door frequently during baking, as temperature fluctuations can cause cracking. If your oven has a light, use that to check progress rather than opening the door.
Step 4: Cooling and Chilling Process (4+ hours)
This step requires patience but is absolutely crucial for the perfect texture. Take the cheesecake out of the oven and set it on a wire rack to cool. Allow it to cool completely at room temperature for about 1 hour. During this time, the cheesecake will settle and finish cooking through.
After room temperature cooling, cover the cheesecake with plastic wrap (make sure it doesn’t touch the surface) or aluminum foil and refrigerate for at least 3 hours, though overnight is ideal. This chilling time allows the flavors to develop and the texture to set properly.
Step 5: Final Decoration and Serving
Before serving, remove the cheesecake from the refrigerator and let it sit at room temperature for 10-15 minutes for easier slicing. Add dollops or a border of whipped cream around the edges or over the entire surface, depending on your preference.
Create an elegant finish with chocolate drizzle by melting chocolate chips with a small amount of cream or oil, or use high-quality chocolate syrup. Drizzle in decorative patterns or create a simple crosshatch design.
For clean slices, use a sharp knife dipped in warm water and wiped clean between each cut. This prevents the creamy filling from sticking to the blade and ensures beautiful presentation.
Tips for Success
Temperature Control is Everything: The most common cause of cheesecake failure is temperature issues. Ensure all ingredients are at room temperature before mixing, and never rush this step. Cold ingredients create lumps and uneven texture that can’t be fixed later.
Proper Mixing Method: Thoroughly blend the cream cheese and peanut butter first, then gently mix in the eggs until just incorporated. Overmixing incorporates air that can cause cracks and an uneven texture.
Perfect Doneness Cues: The cheesecake is done when the edges are set and slightly puffed, but the center still has a slight jiggle. It should not be completely firm, as it will continue cooking during the cooling process. A toothpick inserted in the center should come out with just a few moist crumbs.
Preventing Cracks: Besides proper mixing and temperature control, you can prevent cracks by placing a pan of hot water on the oven’s bottom rack during baking. The steam creates a humid environment that prevents the surface from drying out too quickly.
Storage and Make-Ahead Tips: This cheesecake actually improves with time. Make it 1-2 days ahead for the best flavor development. Keep refrigerated in a covered container for up to 5 days. For longer storage, wrap well and freeze for up to 3 months – thaw overnight in the refrigerator before serving.
Serving Temperature: For the best texture and flavor, serve cheesecake slightly chilled but not ice-cold. Remove from the refrigerator 15-20 minutes before serving for optimal creaminess.
Troubleshooting Common Issues: If your cheesecake cracks, don’t despair! Cover cracks with whipped cream, fruit, or chocolate ganache. If the texture is grainy, it’s usually due to overmixing or ingredients that weren’t at room temperature.
FAQ for Peanut Butter Cheesecake
Can I make this recipe ahead of time? Absolutely! Actually, Peanut Butter Cheesecake ranks among the top desserts to prepare in advance. The flavors actually improve and meld beautifully after 24-48 hours in the refrigerator. It can be prepared as early as three days before serving. Just add the whipped cream and chocolate drizzle right before serving to maintain the best presentation and texture.
Can I substitute ingredients for dietary restrictions? Yes, with some modifications. For gluten-free versions, use gluten-free graham crackers for the crust. For dairy-free alternatives, you can substitute the cream cheese with dairy-free cream cheese (though texture will be different), and use coconut whipped cream instead of regular whipped cream. Sugar substitutes can be used, but they may affect texture and you’ll need to adjust quantities according to the specific substitute’s conversion guidelines.
What’s the best way to store leftovers? Refrigerate any remaining cheesecake in a covered container for up to five days. Use plastic wrap or aluminum foil, making sure it doesn’t touch the surface of the cheesecake. For individual slices, you can wrap each piece separately. The whipped cream topping may deflate slightly over time, but the cheesecake itself will maintain its quality.
Can I freeze this cheesecake? Yes! This cheesecake freezes well for up to three months. Wrap it tightly in plastic wrap, followed by a layer of aluminum foil, leaving off any toppings. For individual portions, wrap slices separately. Let it thaw in the refrigerator overnight before serving, then top with freshly whipped cream and a drizzle of chocolate. Never thaw at room temperature as this can affect texture.
Is it possible to substitute crunchy peanut butter for creamy? Yes, but the texture will be different. Crunchy peanut butter will add small pieces throughout the cheesecake, which some people love for the added texture. However, it won’t be as smooth and creamy as the traditional version. If using crunchy, you might want to process it briefly in a food processor to break down the larger pieces.
How do I know when the cheesecake is perfectly done? An ideal cheesecake will have firm edges, while the center should wobble slightly when the pan is gently shaken. It should not be completely firm, as it will continue to set during cooling. The surface should not be browned, and a toothpick inserted near the center should come out with just a few moist crumbs attached.
Conclusion
Peanut Butter Cheesecake represents the perfect fusion of comfort and elegance, transforming two beloved flavors into a dessert that’s both sophisticated and satisfying. This recipe proves that some of the best culinary innovations come from combining classic favorites in new and exciting ways.
What makes this cheesecake special is not just its amazing flavor, but also its adaptability and consistent results. Whether you’re celebrating a special occasion, hosting a dinner party, or simply treating yourself to something extraordinary, this Peanut Butter Cheesecake delivers consistent, impressive results that will have everyone asking for seconds and the recipe.
Don’t hesitate to make this recipe your own by experimenting with different crusts, toppings, or even mix-ins like chocolate chips or crushed peanut butter cups. The foundation is solid enough to support your creativity while being foolproof enough to ensure success every time.
We’d be thrilled to hear about your experiences making Peanut Butter Cheesecake! Share your photos, creative variations, and family reactions in the comments below. Did you try a different crust? Add any special toppings? Your experiences and modifications inspire other bakers and help build our community of dessert enthusiasts.
Remember, the best desserts are those that create memories and bring people together. This Peanut Butter Cheesecake is guaranteed to become a treasured recipe in your collection – one that you’ll turn to again and again for life’s sweet celebrations. Happy baking, and enjoy every creamy, dreamy bite!